- Home
- Incubation day by day
- Day 18
Chicken incubation, day 18.
Today is probably the most critical day of any in the incubation process. It's the day we make sure our chicken eggs have the ideal environment to be able to hatch safely as healthy chicks at around day 21.
Chicken incubation at day 18 is known as "lockdown day". It's such an important day, with such critical steps, that I have a detailed article about those steps alone. You'll see it in the links below.
This is a long article, but the information it contains about what needs doing at this point in chicken egg incubation is critical to a successful hatch. Don't skip anything!
To help you find different sections, use these links.

Chicken incubation, day 18: what's going on in the egg today?
- For the next three days of incubation until hatch, the chick just carries on growing. All its organs are in place and will fully develop before hatch.
- The albumen (egg white) has now completely disappeared. The yolk continues to be absorbed into the chick's body.
- If we opened the egg today what we'd see is mostly chick, with a decreasing expanse of yolk.
- We'd also see the chick completely encased in the membrane, which needs to remain moist between now and hatch. If it doesn't, the chick will become "shrink-wrapped".
What's happening to the chick at day 18 in the incubator?
- From now until the end of incubation there's not much change in the chick itself, except that, as the yolk is retracted into the body, the chick grows in size.
- The chick continues to turn slowly towards the blunt end of the egg and the air cell. It's here the 'egg tooth' will first break through the inner membrane so that the chick can take its first breath, before "unzipping" the shell.
Please note: the image below is a commissioned piece and is subject to international copyright laws. I am the sole copyright owner.
It must not be used, copied or reproduced anywhere without my permission.
Contact me for details and permissions for this and all other images on this page.
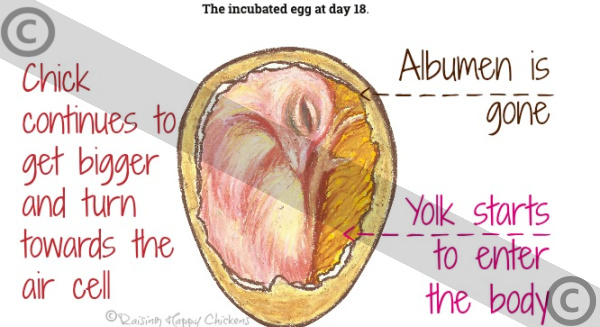
- The yolk continues to be absorbed and will nourish the chick during its last days of incubation. It will also keep it well nourished for up to 48 hours after hatching.
- This is one of the reasons why it's possible for breeders and hatcheries to send day-old chicks by post: the chicks don't need food at that point.
- Finally, the heart rate starts to slow down from around 230 – 260 beats per minute to around 210. The exception to this is when the chick is actually moving, when the heart rate is too high for a monitor to read.
Chicken incubation at day 18: what can we see if we candle today?
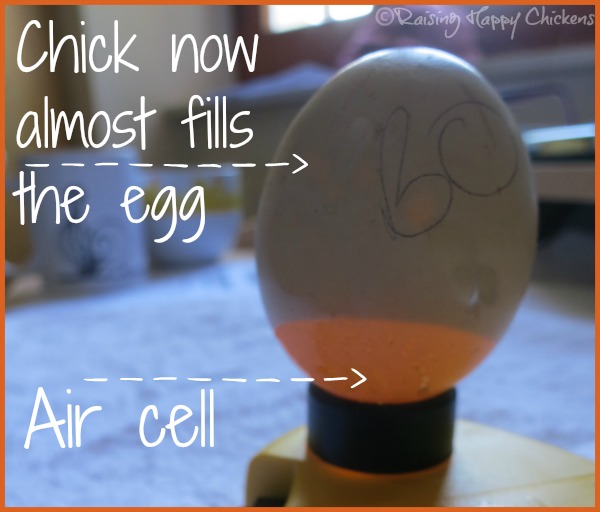
We can't see anything much now. The chick is filling most of the egg, with the yolk taking up the remainder of the room. Sometimes it's just possible still to see some large blood vessels at the bottom of the egg.
The air cell is quite large and will continue to grow over the next three days to hatching.
This is one of my Buff Orpington eggs, candled at day 18. The air cell has developed well during incubation.
It's here the chick will start to emerge on hatch day.
What should we be doing at day 18?
Please note: locking the incubator down at day 18 is critical to a successful hatch. The details on this page are a summary of what actions must be taken.
For an expanded explanation with extra detail, please see the details of chicken egg incubator lockdown, here.
Lockdown for chicken eggs: what's involved?
"Lockdown" is simply a shorthand way of saying that, at day 18 (or 16 / 17 for bantam eggs) our incubator must be prepared to give the chicks the best possible environment to successfully complete incubation and go on to a safe hatch.
Once those preparations have been made, we will not be touching our eggs or opening the incubator between now and hatch day. This is crucial to make sure the chick is able to turn into the correct position for hatch, uninterrupted.
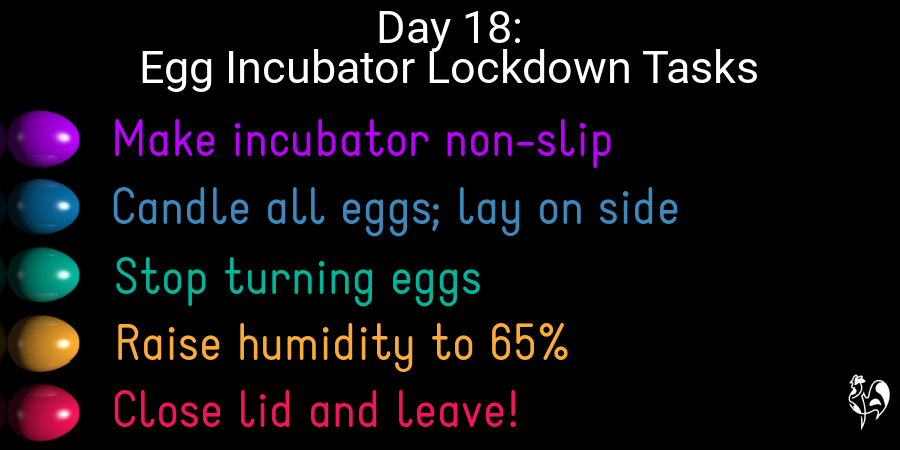
There are five critical steps involved in "locking down" an incubator at day 18. They are:
- Make the incubator base non-slip. If chicks slip before their legs have had a chance to strengthen, they are prone to spraddle (also called 'splayed') leg or even to a dislocated hip.
- Candle all eggs to make sure none are damaged. Remove any showing the slightest signs of cracking or oozing.
- Lay all eggs on their side and stop turning them. Otherwise the chick will not be able to position itself properly.
- Ensure humidity level is raised and oxygen levels are optimised.
- Close the incubator lid and leave it until hatch day.
Humidity for hatching chicken eggs.
Until lockdown day, the humidity levels in the incubator should have been kept constant at around 45%.
Today this must be increased to 65%. If not, there's a danger the membrane around the chick will dry out and the chick will be "shrink wrapped" and unable to release itself.
To learn how to increase humidity, see this article.
The temperature should be left exactly as it has been throughout: 37.5ºC or 99.5ºF.
Can anything go wrong at day 18 of incubation?
Absolutely!
It's especially important that you candle all remaining eggs today – it's one of my critical 5 steps to lockdown.
Here's why. Below is a photograph of one of my eggs, candled at day 18. It's not easy to see anything because this embryo had developed normally until this point. The chick was filling the shell, so there's not much to be seen.

Except... look closely.
This egg has a crack.
Here's another picture with the image enlarged and its brightness turned up. It looks very grainy, but it highlights the crack. In case you still can't see it I've also annotated it.

To make it even more obvious, in picture below I've altered the saturation of the image. The crack is the thin line which now looks red. It starts at the tip of the bottom arrow and continues to the tip of the top one.

After I had candled it, I examined it more closely and noted it had some liquid starting to ooze out of the crack.
Had this egg been left in the incubator, it would have exploded and spread bacteria over the other 23 eggs. The entire hatch would have been compromised.
Which is why it's so critical to follow procedures for lockdown at chicken incubation, day 18.
What went wrong with this incubated egg?
Most late embryo deaths and unsuccessful hatches are due to different forms of bacteria or loss of humidity at critical times.
I was lucky – this was the only egg to be affected in this batch.
But why did it happen so late in incubation?
It's likely that I'd become complacent and not been careful enough about cleanliness when handling it.
As incubation progresses, the shell becomes more and more porous and therefore more susceptible to taking in external bacteria.
So washing hands, or using a good quality handwash (#ad), both before and after candling is extremely important.
Question of the day.
What should I do if I find a cracked egg in my incubator at this stage?
If it has any signs of a sticky liquid coming from the crack, don't hesitate – get rid of it now.
It's heartbreaking to make it to day 18 and have to lose one, but trust me – it's necessary.
If there's no liquid you have the choice of trying to seal the crack and hope the chick is still alive. It's a risk, because if it's died you run the risk of the egg exploding, but it's been done successfully by several people I know.
The best things to seal a crack are a very strong duct tape, superglue, or candlewax.
Chicken egg incubation: where to next?
The first of these picture links is a general overview of this day by day incubation series. The second will return you to yesterday's information, and the third will move on to tomorrow's, at day 19.
Other related pages you may find helpful.
Sources.
A lot of "facts" you'll find on the internet are often people's individual views, based on inaccurate information repeated from poor quality sources.
The information I provide in this article and others is based on both my own experience of incubating and hatching chicken eggs every year for over 13 years, but on evidenced facts from scientific, peer-reviewed research and books from highly respected and experienced poultry keepers such as Gail Damerow.
Some of the trusted sources I have used in this article are these.
Avitronics: Heart Rates. Pub. Avian ID, 2020.
Damerow, Gail: Hatching and Brooding Your Own Chicks. Pub. Storey, 2013. See my review, here.
Hall, C., et al: A new candling procedure for thick and opaque eggs and its application to avian conservation management. Pub. Journal of Zoobiology, 2022.
Hamburger, V and Hamilton, H L: A series of normal stages in the development of the chick embryo. Pub. Journal of Morphology, 1951.
Leonor, H., and Chaveiro, S: The Effect of Candling on the Hatchability of Eggs from Broiler Breeder Hens. Pub. Journal of Applied Poultry Research, 1993.
Phuphanin, A., et al: Smartphone-Based Device for Non-Invasive Heart-Rate Measurement of Chicken Embryos. Pub. National Center for Biotechnology Information, 2019.
Vargas, R., et al: Egg Candling Analysis Equipment Design: A Safety Solution. Pub. Journal of Social and Behavioural Sciences, 2018.
Wu et al: Egg fertility and reduced egg fertility, hatching success, and larval survival. Pub. Science Direct, 2003.
- Home
- Incubation day by day
- Day 18
