- Home
- Incubation day by day
- Day 3
Incubating chickens' eggs: what's happening on day 3 of incubation?
It's 72 hours into the incubation period. What does our chick look like, and what do we need to do about the incubator settings?
Things are now really starting to happen. We still won't be able to see anything if we candle at this early stage, but inside the egg the embryo is beginning to take on a shape of its own. It's no longer a simple cluster of cells.
If we opened the egg now, we'd see some very obvious blood vessels on the surface of the yolk, and the embryo would appear as a tiny question mark in the middle of them.
This is the beginning of your chick.
Incubating chicken eggs: what's happening at day 3?
This point of the incubation process is critical.
- The embryo has grown considerably since yesterday.
- The blood vessels have branched and the heart is much bigger.
- Under a microscope the spinal column is clearly visible in the shape of a question mark.
- Between 60 and 64 hours after the start of incubation the chick's nose, lungs, legs, wings and tail have begun to form.
Please note: the image below is a commissioned piece and is subject to international copyright laws. I am the sole copyright owner.
It must not be used, copied or reproduced anywhere without my permission.
Contact me for details and permissions for this and all other images on this page.
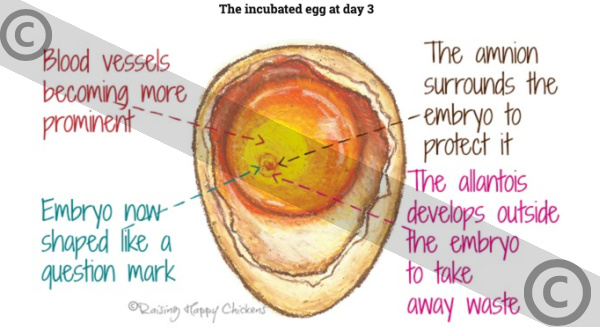
The most obvious development is the growth of the circulatory system.
- Until now, the embryo has relied on blood vessels developed during its first 48 hours for oxygen.
- At about 66 hours into incubation, it starts to need more air than those vessels can provide, so the allantois forms outside the embryo and starts work.
- The allantois has a dual purpose: it is responsible for collecting waste from the embryo and carrying it away, and is critical in carrying oxygen to the embryo.
- The amnion, a small sack filled with amniotic fluid also grows during day 3 and surrounds the embryo. The amnion's job is to protect the growing chick and cushion it from any jolts.
What can we see if we candle the incubated egg today?
Please note: when incubating chickens' eggs I do not recommend candling this early in the process. I have candled for the purposes of demonstration only.
At this stage it is very unlikely that you'll see anything related to the developing embryo – and there's a risk of damaging development by moving it at what is a critical stage.
It's virtually impossible to see either the developing blood vessels or the embryo itself at this stage in the process, even with a very light-coloured egg.
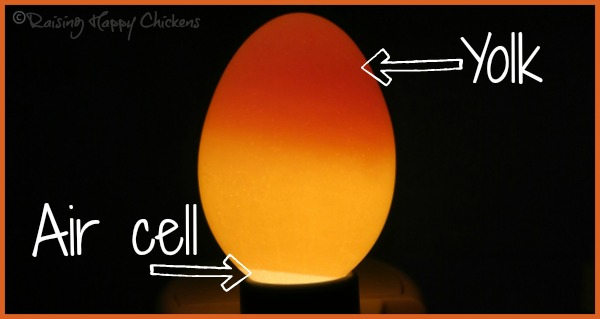
If there is any development which can be seen by the naked eye today, it is simply the beginning of the air cell.
Incubating chicken eggs: air cell development.
The air cell of an egg is found at the blunt end, and is critical to hatching. It's the point at which the chick pips (pecks) through the internal membrane shortly before breaking through the shell itself.
The space between the egg shell and the inner membrane – the thin white layer you'll see if you boil an egg – grows during incubation. This happens as water evaporates and pulls the membrane away from the shell, creating an air pocket.
When incubating chickens' eggs, the air cell starts as a very small area...
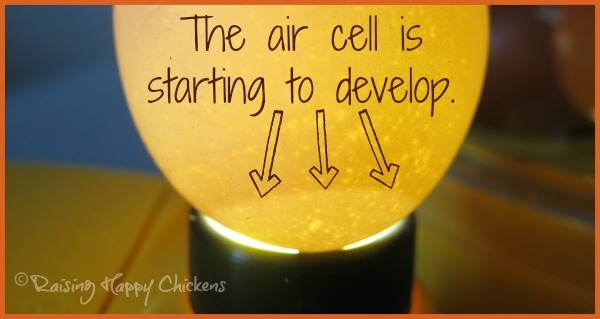
...and in a successful incubation process it should grow to a substantial size. We'll see this as we go through the day-by-day development.
It provides the hatching chick with enough air to breathe before it is able to make a hole in the shell and breathe the air outside.
This is why it's so critical to set your incubating chicken eggs with the blunt end pointing up. It allows the air cell to properly develop, and sets the chick in the right position for hatching.
What should we do during this period of incubation?
As far as the incubating chickens' eggs are concerned – nothing.
Just do what you've been doing for the past three days: make sure the temperature and humidity levels are kept stable, and the eggs are turned at regular intervals.
Prepare for candling.
However, in a couple of days' time we are going to begin to candle the eggs. If you've never done it before you may want to start practicing today, so that when we come to candle for real you'll have more confidence.
 Pin this image!
I recommend that you experiment with candling by using a shop-bought egg, or one of your own eggs that you're not incubating, particularly if you've never candled before.
At this stage, don't try to candle any of the eggs in your incubator.
Firstly, it's far too early to see anything with the eye, even with the strongest candler light.
More importantly, though, accidents happen even with the most experienced candler. Eggs slip and crack; or they're outside the warmth of the incubator for too long; or
Far better to practice using an egg which won't matter too much if it's dropped.
See my detailed article about how to candle chicken eggs, here.
Can anything go wrong at this stage of incubation?
The first week of incubating chickens' eggs is critical because the embryo is at a very vulnerable stage as it begins to develop.
Turning remains essential to prevent the embryo sticking to the shell, but any other movement is not something I would recommend.
It's very tempting to want to candle eggs at every stage, and if you have young children or grandchildren it will be hard to explain why they can't immediately see any development. But it's really better to leave it for at least another 24 hours – preferably longer.
Incubating chickens' eggs: question of the day.
One of my eggs seems to have a glunky liquid coming out of it. What is this?
It's likely that an egg which seeps a glue-like substance has cracked.
The main reason for this at such an early stage of incubation is that there was already a hairline crack in the shell which was not picked up by candling before the egg was put into the incubator.
As the egg warms, the liquid inside it expands and seeps through the crack.
Can anything be done? Not once it's seeped, because seepage means the membrane has been breached and there's a danger that the contents of the egg will explode, releasing bacteria which might well contaminate and kill your other embryos.
An egg which is seeping should be removed from the incubator straight away.
If it hasn't seeped but is cracked, some people recommend sealing the crack with candle wax, superglue or a very strong tape ('gorilla tape' for example).
The danger here is that bacteria may have already entered the egg and in the warm, humid environment of an incubator would grow, so the egg slowly becomes bad and finally explodes.
An sion of bacteria is likely to be fatal when you're incubating chickens' eggs. My advice would be – don't risk it.
More incubating information.
Sources of information for incubating chickens' eggs.
A lot of "facts" you'll find on the internet are often people's individual views, based on inaccurate information repeated from poor quality sources.
The information I provide in this article and others is based not just on my own experience, but on evidenced facts from scientific, peer-reviewed research and books from highly respected and experienced poultry keepers such as Gail Damerow.
Some of the trusted sources I have used in this article are these.
Damerow, Gail: Hatching and Brooding Your Own Chicks. Pub. Storey, 2013. See my review, here.
Hamburger, V and Hamilton, H L: A series of normal stages in the development of the chick embryo'. Pub. Journal of Morphology, 1951.
Wu et al: Egg fertility and reduced egg fertility, hatching success, and larval survival. Pub. Science Direct, 2003.
Lee, B. R. et al: 'A set of stage-specific gene transcripts identified in EK stage X and HH stage 3 chick embryos'. Pub. BMC Developmental Biology, 2007.
Leonor, H., and Chaveiro, S: The Effect of Candling on the Hatchability of Eggs from Broiler Breeder Hens. Pub. Journal of Applied Poultry Research, 1993.
- Home
- Incubation day by day
- Day 3
