- Home
- Incubating: short course
- Candling
Candling incubated chicken eggs: the fascination of watching a speck grow into a chick.
This article is part of my free email incubating course.
Currently free for a limited period to members of my "Chicken Digest" newsletter group only, this is a short, six email course leading you through the most critical parts of the incubating process step by step.
To sign up for this course and be added to my friendly Chicken Digest community, follow this link.
If you're already part of the Digest group and have not yet opted into the course but would like to, please let me know by replying to one of my newsletters.
Candling your eggs as the embryo develops is one of the most exciting parts of incubating and hatching your own chicks.
If you're not sure what candling means, how to do it, what to look for, or when is the best time to candle, you're in the right place.
Candling incubated chicken eggs provides the most interesting, exciting experiences of the entire incubating process.
But if it's not done properly, it can cause untold stress, and damage to the eggs.
This article gives you the low-down on everything you need to know:
* What does candling an egg mean?
* How is it done?
* What problems might there be?
* What should you be looking for?
Finally, I answer some of your most often asked questions about the candling process.
Let's start at the beginning.
Links on the rest of this page are "affiliate links". If you click on them and buy, I earn a small commission at no cost to you. I only recommend products I know and love and which I think will be genuinely useful to you. See my disclosure policy for more information.
This is a lengthy, very detailed page. Use these links if you want to reach a particular section quickly.
What does candling chicken eggs mean?
Put simply, candling is the name given to looking at the inside of a developing egg by shining a bright light through it.
It's used by people who are incubating chicken eggs (or any other kind of egg) for two reasons:
- to test whether an egg is good enough quality to go into the incubator, and
- at different stages during incubation to see whether the embryo is developing as it should.
Candling gives valuable clues as to whether you should expect problems during incubation – whether the embryo has died, for example – or after hatch. It's a critical skill to develop if you want to incubate your own eggs.
In this article, you'll learn all you need to know to candle eggs effectively.
Candling eggs: how to do it.
It's really very simple.
- Always wash your hands before candling, preferably with a good quality medicated hand wash.
- This avoids transmitting any bacteria onto the egg. As the egg gets further into incubation it becomes more porous, and the last thing you want is a warm, humid incubator full of bacteria.
- Candle on a soft surface. I usually use a towel or a blanket. If the egg accidentally drops – which can happen easily – it has less chance of smashing than if it fell onto, for example, a wooden table.
- Try to candle eggs when it's quiet and you'll be undisturbed. If you have children who want to watch, make sure they know to avoid sudden movements.
- You'll need to turn the room light off, so it's a good idea to have a torch available if the switch is any distance from the candling table.
- Take the eggs from the incubator one at a time. Try to do this when your incubator is having its "cool down" time.
- Always candle with the pointed end facing downwards. Avoid jolting the egg - be very gentle.
- Keep the eggs outside the incubator only for as long as it takes to candle them. The heart rate cools quickly the longer the eggs are outside its warmth.
Candling eggs at day 5 of incubation - a video.
In this video, I use Brinsea's candler and OvaScope to candle some eggs at day 5 of incubation. Look for...
- the "spider" of embryo plus veins which tell us the egg is fertile
- the air cell, which tells us the chick is growing well
- any cracks in the shell which might become a problem.
When to candle.
- Candling eggs before they go into the incubator is always a good idea. To find out why, have a look at this page.
- Once they are set in the incubator it's not a good idea to candle every day, even though it's very tempting. If you've got children they will probably want to because it's an exciting process. But accidents can happen, no matter how careful you are, so try to limit it.
- Candling eggs somewhere between Day 5 and Day 7 is a good idea to see which are developing. At that stage, mark those that don't seem to have developed.
- At Day 10 re-candle those you've marked as possibly not being viable and, if they still show no signs of developing take them out of the incubator. It's hard, but it has to be done.
- Egg candling at Day 18, just before you 'lock down' the incubator, is critical. Candle all your eggs to make sure none have died in the meantime. If any are showing signs of non-development take them out of the incubator now.
- Leaving those which have not developed, or started but failed to continue, can cause them to explode and scatter bacteria over the rest of the incubator. That's a real no-no if you want a successful hatch because bacteria can enter the other shells and kill the embryos.
Different types of egg candle lights (candlers).
Using a candle to candle eggs.

Talk to older people who hatch their own chicks and they'll tell you it's called "candling" because it used to be done with a candle.
The incubated egg was held over the flame in a darkened room, which allowed the person to see through the shell.
Perfect? No, not at all.
The problem with using a candle is that they're unstable - and very hot. The last thing you want to do with a fertile egg is cook it.
So candles had their drawbacks and should never be used in modern incubating and hatching.
Using a flashlight as an egg candler.
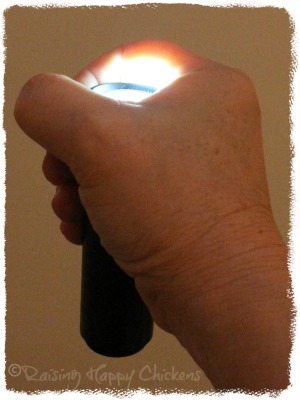
Definitely a step in the right direction, flashlights are not as hot, and a lot more stable.
Even now it's easy to use a small flashlight for candling. You just need a strong light – halogen bulbs are ideal – and either a home-made box or your hand, made into a fist.
Dealing with the fist-version first, it works by the light being held inside the fist with the bulb close to the top and the egg balanced on the clenched fist.
The benefits of this are that it's a relatively cheap way of doing it, and it's very simple.
Drawbacks? The light tends to be less strong because some of it is absorbed by the hand.
But the main drawback is potential accidents. It's very easy to drop an egg balanced on a fist, especially if you're trying to take photographs at the same time.
Make sure you candle on a soft surface in case you drop the egg. I use a towel or a blanket on my candling table.
If you'd like to use a flashlight, make sure it has a strong, preferably, LED, lamp.
DIY egg candlers.
- A second option for this hand-held method is a flashlight app on a smartphone.
- I occasionally use this if I want to candle an egg quickly and don't have time to set up my ovascope. As long as you have a strong light, it works reasonably well.
- I've also used an inexpensive LED light I bought at a supermarket, with a round cardboard ring which I taped on to concentrate light into the egg.

- Although the light was bright enough, I couldn't prevent it from spilling outside the cardboard ring even using duct tape.
- I do use this little light sometimes, but need to use my hand to prevent the light spill.
- The LED lights are strong and don't overheat, so from that perspective it's reasonable. But a properly made candler is better!
The home made box candler.
If you're not sure whether you're going to hatch again (although I guarantee you will!), you may not want to invest in a commercially-made candler.
A home-made, table-top candler isn't difficult to achieve and can be very effective. Have a look at this short video which shows how it can be done.
- Advantages of a home made candler: it's cheap to make and very effective.
- Disadvantages: you need to be very sure the heat doesn't build up. You don't want to cook the eggs...
- Because it doesn't enclose the egg, dark shells such as the chocolate brown Marans are very difficult to candle, even in a darkened room.
Commercially made candlers.
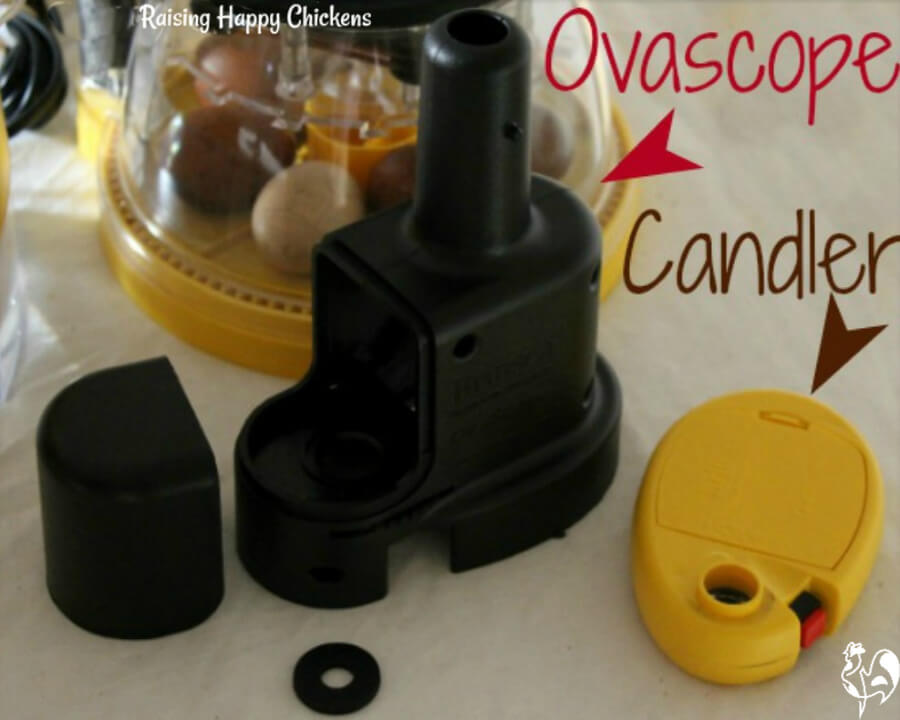
This is the modern equivalent of both the candle and the flashlight, and much easier to use.
Powered by batteries, this high intensity candler's light is not hot, but is strong enough to give an excellent view through the shell, especially if used in a darkened room.
- Advantages: Very easy to use and, when combined with the ovascope (the black contraption above which looks like a microscope), they're particularly good for candling dark shells like the Marans.
- Wonderful for children to be able to see the developing chick - brings alive the wonder of birth as if by magic.
- Disadvantages: Quite expensive to buy, particularly if you're not sure you'll hatch chicks frequently.
- For my detailed review of the Brinsea candlers, including pictures showing how they work, see this page.
Frequently Asked Questions.
Why is candling important?
For four reasons:
- To make sure the eggs are the best possible quality before they go into the incubator.
- To watch the embryo develop during the 21 days of incubation.
- To help know to discard eggs which are not developing before they explode and spread bacteria through the incubator.
- To analyse problems if you have a poor hatch rate.
Will candling tell me whether an egg is fertile or not before incubation?
No.
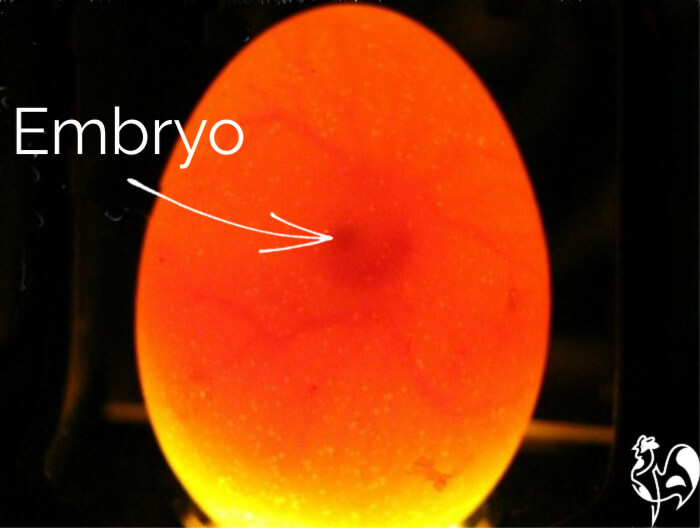
The only way of knowing whether it's fertile, short of breaking the shell open, is by
incubating it for six or seven days. If you candle then, a fertile egg will have a small embryo forming together with some
spider-like veins.
This is one of my Wyandotte eggs at Day 5 of incubation. You can just begin to see the tiny dot of the embryo in the middle, with veins running off to the side.
How do I know what I'm looking for?
- You're watching for proper development of the egg, and any cracks or blood rings appearing.
- If you're new to candling, you'll need help to gauge whether what you're seeing is what you should be seeing.
- My step-by-step guide to hatching covers exactly that with text, photos and video-clips. You can find out more about it here.
Does it matter which way up the egg is when candling?
It's wise to keep the more pointed end of the egg facing down. I very occasionally candle with the blunt end down to be able to see the embryo more clearly, but it does run the risk of damaging the embryo, particularly in the first couple of weeks.
Please note: fertile eggs should always be stored and incubated with their more pointed end downwards.
Does moving the egg during candling damage it?
No, as long as you're careful and as long as you don't candle after day 18 of incubation. You will generally need to turn the egg to see what's going on inside, particularly as you come to the later stages of incubation. Always take it slowly.
Some commercially-made ovascopes like the Brinsea have a turning wheel to help with this. If you don't have an Ovascope, use your hand to turn but be careful – eggs slip easily.
How long should the egg be out of the incubator?
As little time as possible.
If you're just checking whether it's
damaged or developing, candling should only take a few minutes. If you've
got children who are keen to see what's going on inside, it may take longer.
As a 'rule of thumb', you shouldn't keep it out of the incubator for longer than thirty minutes absolute maximum. I try to candle when the incubator is cooling down for an hour each day, as both the Brinsea incubators I use do.
Is it safe to mark eggs during candling?
Yes, it's perfectly safe to mark eggs as you candle them, and it helps keep an eye on progress.
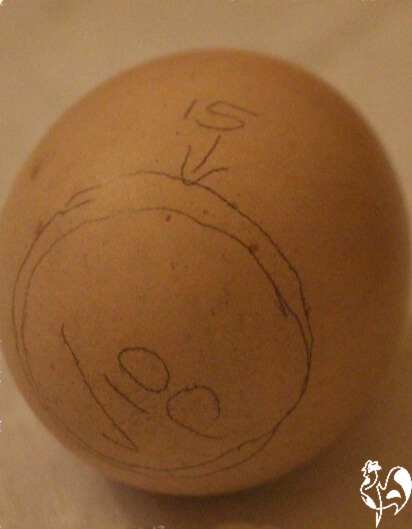 Air cell development marked at days 10 and 15.
* Using a pencil (don't use a marker pen - the ink can infiltrate the shell), mark the day it was candled together with whatever your 'shorthand' is for "developing", "not developing" or "not sure".
* It also helps to mark the air cell at intervals so you can see that it's still growing, particularly during the final stages when it's hard to see much else.
* This will tell you, once the chick starts to 'pip' - break through the shell - whether it's in the right place or not.
* I also mark each one with its breed and with a number which I then keep on a chart.
* This allows me to keep tracks on which eggs have been most successful and to look at possible areas where I can improve the likelihood of a good hatch.
Like to know more about incubating and raising your own chicks?
Here are some of my most popular incubating articles. Click the buttons to go to that page.
- Home
- Incubating: short course
- Candling
