- Home
- Before you incubate
- Transporting Fertile Eggs
How to transport fertile chicken eggs to ensure the best possible hatch rate.
So you've ordered eggs by post and you're not sure what to do when they arrive? Or you want to take eggs on a plane but not sure if you can?
It's critically important that the eggs you put into the incubator are as healthy as they can be.
They should come from healthy hens, be stored at optimum temperatures, be transported as smoothly as possible and left for a number of hours before being set in the incubator.
It's not always possible to collect eggs from a supplier locally - you may need to have them sent by post.
How should they be treated when they arrive?
Or perhaps you want to start a small business supplying other people, in which case you'll inevitably need to send some of your own eggs by post.
In that case, you'll need to know exactly what the best conditions are to transport hatching eggs from one place to another - within or even outside your own country.
And how long can eggs last between collection and incubation, anyway?
In this article I answer six commonly asked questions about transporting hatching eggs, from optimum storage to the problems you may face if you order some to be delivered by mail. I also suggest potential solutions to those issues.
First, let's look at optimum storage for fertile eggs.
If you purchase a product through links on this page, I may receive a small commission at no extra cost to you. I only recommend products I have bought (or would buy) myself, and which I believe will genuinely benefit you. You can read my full disclosure policy here.
Q1: You've received some hatching eggs by post. What should you do to make sure they're in the best condition for incubation?
- If you know your eggs are at a sorting office, arrange to collect them yourself. Having them bounced around in a delivery van with lots of other packages will not help them survive.
- Once you get them home, unpack them immediately, being careful how you handle them.
- Check for any cracked eggs and discard them straight away. Larger cracks as in the image below are obvious, but tiny, hairline cracks aren't always visible to the naked eye. The most effective way to look at the shell is using a good candler.
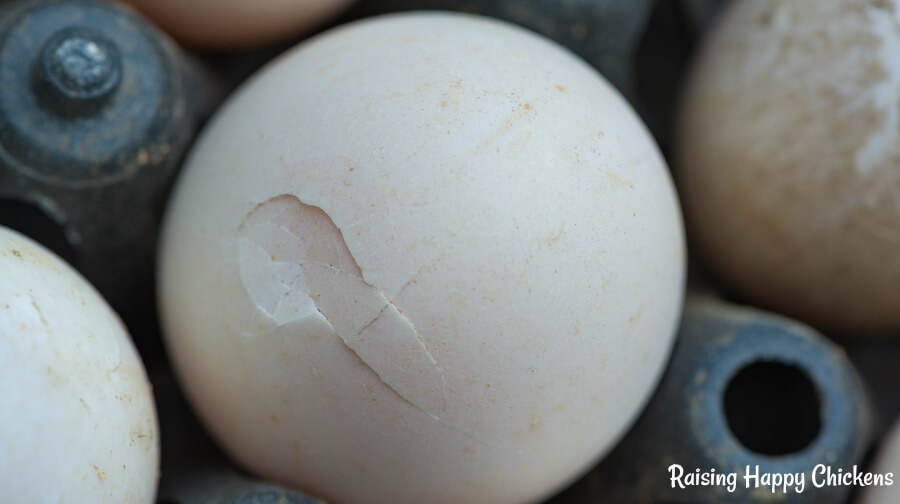 An egg not properly packed is liable to damage whilst in transit.
- Most suppliers won't take responsibility for damaged eggs sent by mail, because they (generally rightly) say the damage occurs in the rough handling they receive in transit. But it's worth informing them anyway, particularly if the eggs don't seem to have been very well packed.
- Supplied hatching eggs should be clean. If they look dirty when you unwrap them, clean the worst off either with a light sandpaper, or by rinsing gently under cool running water.
- Now place your eggs into a container with the pointy end downwards and leave to rest at room temperature for 24 hours. This is a really important step: it allows the air cell to settle back into position after the jolts of transport.
- Turn on your incubator and allow it to come to the correct temperature while your eggs are resting. Once the eggs have rested for 24 hours and the incubator's temperature is consistent, you're ready to begin incubating!
Q2: What problems may there be with eggs which have been sent by post?
- Apart from cracked eggs, the major problem with eggs sent in the mail is the disturbance of the air cell. The jolting in transit causes the air cell to detach from the shell.
- Not sure what to look for? Watch this short video to see a detached air cell in a candled egg.
- That can lead to an unsuccessful hatch. the air cell is critical for the chick to hatch into - it's where she will take her very first breath. If the air cell doesn't develop, the chick won't be viable.
- When candling the eggs before incubation, look for a saddle shape, or what looks like an air bubble floating on one side of the egg.
- How to deal with a detached air cell? Rest your eggs at room temperature, pointy end facing down, for 24 hours before incubation. In some cases, the air cell may re-attach.
- There's some evidence that incubating eggs with detached air cells with the pointed end down results in more success than incubating horizontally. Incubators like the Brinsea Octagon 20 are ideal for this.
- Some people also stop turning detached air cell eggs at Day 16 rather than 18 to give the fragile air cell more chance to settle before hatch. Does it work? Well, turning at that point is not as critical as in the first days of incubation, so it's worth a try.
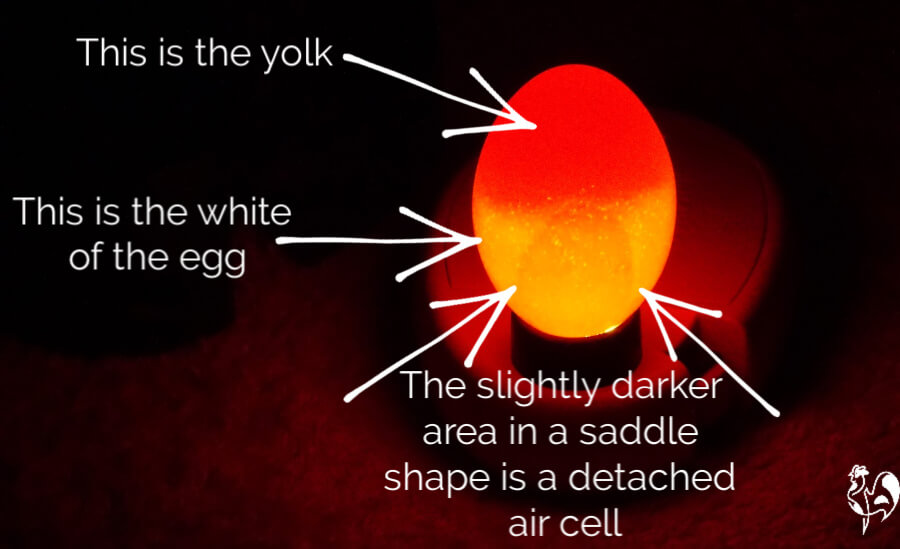 A sure sign of a detached air cell: a clear saddle shape on candling.
Q3: How long can you keep eggs before putting them in an incubator?
Obviously, the fresher the eggs, the more chance of a successful hatch. The longer you keep them, the more their fertility declines.
Most experts agree that eggs are best set in the incubator within a week of being laid. I have successfully hatched eggs up to three weeks after they've been laid, so it's obviously not ideal but it is possible - provided they're kept in the right conditions.
Here's how:
- Use the cleanest eggs possible. Dirty eggs have a much greater chance of transmitting bacteria once they're incubated.
- Store the right way up. The pointed end should face downwards.
- Keep the eggs dry, and at an optimum temperature. Between 5ºC and 10ºC (40ºF to 50ºF) is ideal.
- Turn gently (by twisting) at least four times each day, more often if possible.
For more detailed information about storing fertile eggs, take a look at this article.
Q4: Need to send hatching eggs by post? Here's how.
- If you've decided to sell some of your own eggs, always test for average fertility levels in the flock by incubating a collection of eggs before selling any. Calculate the percentage of those which, when candled at Day 5, have started to develop.
- Make sure when advertising you are honest about your average fertility rate, and be clear in stating that no-one can guarantee that every egg collected will be fertile.
- Make your buyers aware of the risks of sending eggs through the post. You cannot be held responsible for rough handling by the postal services - but you are responsible for making sure the packaging is as secure as possible.
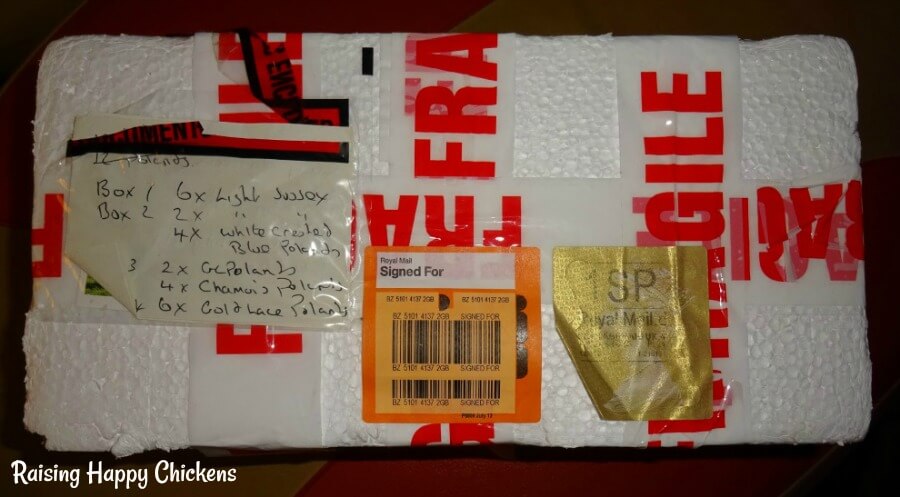 A well wrapped package of hatching eggs sent to me via courier.
- Collect the eggs as quickly after lay as possible, and ship them as soon as you have all you need for an order. There should be no more than 3 days between lay and shipping.
- Keep them in a cool, dry place whilst waiting to ship. The ideal temperature is between 5ºC and 10ºC (40ºF to 50ºF). Any warmer and there's a danger the embryos will start to develop, but die before they even reach the incubation stage.
- The eggs should be clean. Candle them to make sure they have no hairline cracks and are not too porous.
- Ship using cardboard egg cartons like these (which you can use a custom stamp with to add your name in the centre!). If the eggs are smaller than the cartons allow, pad them with kitchen paper or tissue to stop them moving around.
- Pack the carton(s) inside a robust cardboard box with plenty of bubble wrap or other protection. Mark the box "Fragile: Live Hatching Eggs".
- Obtain proof of postage in case the eggs don't arrive. Let your customer know as soon as they're shipped, so that s/he can make arrangements to collect from the postal depot if possible.
Q5: Can hatching eggs be transported by car across state or country borders?
- Yes. I frequently transport hatching eggs from the UK to my home in Italy. Unable to get the breeds I want to raise in Italy and unable to bring either young chicks or full-grown chickens over, I needed to find a way to grow my flock with the breeds I wanted.
- Transporting by car within your own country, or across country borders within Europe, is no problem. As long as the eggs are well wrapped, snugly positioned in the car so that they avoid unnecessary bumps and kept at cool temperatures, you won't have a problem.
- It's wise to transport eggs in a hard, plastic container, preferably with a lockable lid. I've had instances when, although I thought the eggs were safely stashed in a cardboard carton, luggage has fallen on top of it and damaged the contents.
- It's perfectly legal to take a small number of hatching eggs (i.e., not for commercial use) into and out of the UK and across mainland Europe, and between States in America. The only time when it becomes problematic to move them from one place to another is if there is an uncontrolled outbreak of avian flu.
- Checking with the UK's DEFRA website (here's a link) and the US Center for Disease Control and Prevention will confirm whether that's a current issue when you're travelling.
Q6: Is it legal to transport hatching eggs on a plane?
For detailed information about transporting eggs by plane, see this page.
- The short answer to this is: ask. Regulations can change quickly, so always check a few days before your flight. To be safe, before you travel always call the airport from which you're departing and the airline you're flying with, to check the current situation.
- I have carried eggs on planes from the UK to Italy without any difficulty. Even though there are stringent regulations about carrying liquids in hand luggage, I was assured that eggs count as solids and are not an issue. And sure enough, I had no problems going through airport security.
- The one drawback is that they do have to be passed through the security scanners. However, this has never affected the hatchability of any eggs I have carried by plane.
- The same caveat applies as to transporting eggs across any boundaries by car: in the event of an outbreak of avian flu, it will not be acceptable to transport fertile hatching eggs.
- Again, check the DEFRA site for travel within Europe, and the Center for Disease Control and Prevention in America. And read my article about bird flu, here.
- Make sure the box you use for carrying your eggs has a lid that locks tightly to the box. This is the box I use for flying my eggs.
Want more information about caring for fertile eggs before incubation?
So you've safely taken charge of your soon-to-be-baby chicks. You've made sure the eggs have no cracks, and allowed them to rest after their journey.
Excellent!
So now what?
This series of articles will guide you through the process of caring for your eggs, from the point of delivery right up to the point of incubation.
Following the guide will make sure they have the best possible chance of hatching into healthy chicks.
If you've found this article helpful, you may also like these.
- Home
- Before you incubate
- Transporting Fertile Eggs
